

Sliding gate motor MEKO-8
Motor for sliding gate with Proteco Meko 8 mechanism for gates up to 800 kg. Includes: base and mounting materials, limit switch activation plates, release keys, installation instructions in Greek, etc.
Available in its basic version without control panel, without remote control. Depending on your needs, you can add 1 to 5 remote controls with a control panel, 3 to 6 meters of rack, and wired or reflective photocells.
General information about the Proteco Meko 8 mechanism:
- For maximum gate leaf weight of 800kg
- Non-reversible, permanent lubrication mechanism
- Up to 25 openings/closings per hour. (at 20°C)
- Up to 40 openings/closings per day.
- Single-phase motor (230 VAC)
- Mechanism dimensions: 310x195x310 mm (LxWxH)
- Gate leaf movement speed: 10.5 m/min
- Motor absorbed power: 300 W
- Motor thermal protection: 150 °C
- Features a key-operated door for manual release
- Protection class: IP44
- Gear type is Z16/module 4
- Country of origin: Italy
- Warranty: 2 years
To order this product, please call us at 210.555.0632 or buy it online from our eshop.
Prerequisites for installing the MEKO-8 (Kit-Standard) S on your gate
- It is suitable for garage gates with a maximum weight of 800kg.
- It can operate safely and without problems up to 25 times per hour.
- It can operate safely and without problems up to 40 times per day.
Regarding the weight of the gate, you should ask its manufacturer. However, most sliding courtyard gates weigh around 60-70kg/m. So, in most cases, 800kg is a quite safe limit that a typical residential or even commercial garage gate will hardly reach.
The uses per hour are sufficient for an average garage gate as it can operate approximately every two minutes during peak hours. We should note here that if the motor overheats, it will stop operating until it returns to normal operating conditions. It has thermal protection to protect itself from excessive use.
Finally, the uses per day can cover most cases of residential garage gates. The uses per day are a limit so that the motor does not wear out prematurely and lasts for many years without problems.
Proteco Meko-8 mechanism dimensions check

Sliding garage door with mechanism - Features

Wiring for sliding mechanism and accessories

- The Proteco Meko-8 mechanism requires a 3X1.5mm² cable suitable for outdoor use. If the distance from the electrical panel is long, it would be good to install a 3X2.5mm² cable. In any case, it is advisable for the mechanism's wiring to start from a separate fuse in the electrical panel.
- Wired photocells require 4x0.6mm² cables for the receiver and 2x0.6mm² for the transmitter. If photocells with a reflector are used, then only one 4x0.6mm² cable is required up to the transceiver. Photocell with reflector cost a little more, but if the wiring has not been laid, they provide an immediate solution without patching and extra work.
- The key-operated push button (key switch) or simple push button requires a 2x0.6mm² cable.
- The warning light requires a 1x1.0 mm² or 2x1.0 mm² cable.
The wiring should preferably be done by a qualified electrician. Particular attention must be paid to protecting the cables from moisture, as these installations are outdoors.
Autotech S5060T control panel for sliding garage door mechanisms

The Autotech S5060T control panel is included in the set and is integrated into the mechanism. It is a control panel that combines simplicity of use with all necessary functions and has been tested over time. It combines perfectly with the Proteco Meko 5 mechanism.
Technical specifications:
- Features a socket for the mechanism's limit switches
- We can adjust the mechanism's force.
- There is a possibility for soft start and stop for less wear and tear on the mechanism and the garage door.
- Accepts safety photocells which interrupt movement when they detect an obstacle during door closing and initiate reverse movement (opening).
- There is an available setting for automatic closing of the door with user-selectable closing start time. Photocell use is essential for automatic closing operation.
- There is an option for electric braking.
- The opening direction is adjusted with a microswitch.
- The control panel can accept a push button (key switch or simple push button).
- The control panel can accept a 230VAC warning light without a flasher or a 230VAC lighting lamp.
- Features an integrated receiver with simple operation.
- User information regarding the mechanism's functions is provided via LED lights.
The above control panel has been tested by thousands of users and has proven to be extremely reliable. In addition, it features functions such as mechanism force adjustment, slow start and stop, which make it one of the best choices on the market today.
ProfelmNet PSD-36T sliding garage door mechanism remote control

The ProfelmNet PSD-36T remote control is tested and reliable. It has 4 buttons to which we can set 4 different mechanisms (courtyard gates, roller shutters, overhead garage doors, etc.). It has a fixed 12-bit code at 433.92 MHz. It features a modern design and works excellently with the Autotech S5060T control panel.
Operation of sliding gate photocells
Photocell is a product that significantly increases safety in the use of a sliding mechanism with minimal cost. These specific photocells (IR5001P) are extremely reliable and operate with a voltage of 12-24 VDC or 12-24 VAC, making them compatible with most control panels on the market. They have been on the market for years and do not present problems. They require no maintenance and are quite reliable even in difficult weather conditions.

Photocell operation: The transmitter emits an infrared light beam, in the invisible spectrum, which is directed towards the receiver. When there is no obstacle interrupting the beam, the door operates normally. When the beam is interrupted by an obstacle (vehicle, pedestrian, pet, etc.) during door closing, the control panel instructs the mechanism to stop the door's closing and start the reverse movement (opening). If the beam is interrupted while the door is opening, it continues its movement normally, while if it is open, it is not allowed to start closing.
An alternative solution to wired photocells is the installation of photocells with a reflector. These photocells do not require wiring on both sides of the door, so they are easier to install. They are preferred in cases where the door and the surrounding area have been completed without provision for wiring. They incur a small additional cost compared to wired photocells but are a very good solution when wiring cannot be run.
Metal rack for sliding garage door mechanism
The metal rack is the most common solution for use in metal sliding courtyard gates. The metal rack consists of one-meter pieces, with a diametral pitch of 4 (module 4) and has a cross-section of 12x30mm. Each piece includes 3 spacers. It is installed on gates with a maximum weight of 2 tons and is galvanized for greater resistance to outdoor conditions.

During the installation process, the spacers are welded to the door. The rack is then screwed onto the spacers. The rack has oval holes for the spacer screws. This allows for small vertical adjustments of the rack.
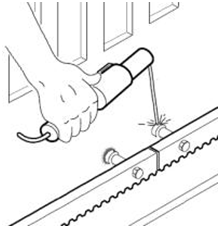


Particular attention should be paid during the installation of the metal rack to the necessary clearance between the gear and the rack. This gap should ideally be 1.5mm. This gap is such that the rack works perfectly with the gear. If the gap is larger, the rack will "kick" and the door's movement will not be smooth. If this gap does not exist and the rack touches the gear, then the mechanism is forced to carry the door, so sooner or later it will wear out and develop a fault.
Sliding mechanism installation process - Briefly
The steps for installing a sliding garage door mechanism are as follows:
- Checking that the door operates smoothly manually.
- Checking for existing wiring or installing new wiring.
- After checks, the motor base is installed. This requires a stable foundation. Usually, a reinforced concrete base is the appropriate solution.
- Mounting the motor onto the base.
- Installing the rack.
- Installing accessories (if any)
- Checking for proper operation of the installation and explaining all details to users for safe use.
The above are simply a brief overview of the steps for installing a sliding mechanism. Inside the mechanism's packaging, you will find detailed, step-by-step instructions, well-written and easy to follow.
Disengagement of Proteco Meko-8 sliding automation
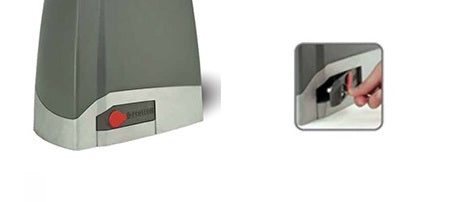
For increased safety, the Proteco Meko-8 mechanism is disengaged with a key. Insert the disengagement key into the lock and unlock it. Then open the small door to its fully open position and the motor now operates manually. By reversing the procedure (locking the small door), we re-engage the mechanism.
Gear of PROTECO MEKO 8 mechanism

The gear of the Proteco Meko-8 mechanism is metallic for greater durability and reliability. It features a protective cover to prevent accidents and protect users.
Packaging of the MEKO-8 mechanism set
The MEKO-8 (Kit-Standard) S set is delivered in two packages (if it contains a metal rack). The first contains the mechanism, the remote controls, the photocells, and any accessories that may have been ordered extra from the set.
The second package contains only the metal rack due to its length and weight.
The set is delivered ready for installation as it has been checked by our technicians and the remote control is programmed.
Installation instructions for the sliding garage door kit
The set is delivered with detailed instructions in Greek. They have been edited by us to be easy to follow even by people who are not directly involved in the field.
They include detailed steps for each stage of the installation, from the motor base and the rack to accessories such as photocells and push buttons. Detailed instructions for the Autotech S-5060T control panel, which is integrated into the mechanism, are also included.